
Although virtual machines or VMs might seem like old technology, Microsoft only debuted its Hyper-V virtualization technology with Windows Server 2008. It wasn’t until May 2012, with the technical preview of Windows 8, that Hyper-V and its associated VMs made their way into a desktop version of Windows.
Since their introduction, Hyper-V VMs have grown to account for about 10% of all VMs used worldwide—an impressive figure considering the extensive use of VMs in cloud environments, which number in the billions. Here, we are not talking about mere millions, but a much grander scale.
For Windows 11 users and administrators, there are many compelling reasons to run VMs on their PCs, even if on a much smaller scale compared to cloud operations. Key among these reasons is:
Microsoft offers two methods for setting up Hyper-V VMs on Windows 11. This guide will cover some foundational knowledge, explore how each method can be utilized, and explain the limitations associated with them.
Hyper-V represents a type of hypervisor, which is software that facilitates the creation, operation, and management of multiple virtual machines on a singular physical hardware unit. This software constructs a virtual environment wherein multiple virtual machines, each with defined configurations such as virtual CPUs, memory, storage, networking, and operating systems, can execute various tasks autonomously within their dedicated environments.
When operating within a virtual machine, the Windows operating system appears and operates as it normally would on any typical hardware. However, externally, the hypervisor coordinates with the primary operating system to manage the relationship between the virtual resources provided to the virtual machine and the actual physical resources available.
Computers that run Hyper-V Manager (a hypervisor integrated into Windows) or alternative hypervisors like VMware Workstation are recognized as host PCs. The virtual machines running on these hosts act as clients to the hypervisor.
As a Windows VM is a virtual implementation of a Windows operating system, Windows 11 VMs are subject to the hardware requirements of Windows 11 itself. Hyper-V introduces additional prerequisites marked by an asterisk:
Currently, there are two methods to establish a Hyper-V VM on Windows 11: a standard approach, and another geared towards developers. The conventional method employs Hyper-V Manager for VM creation and setup. The developer-focused approach introduced in April 2024, utilizes a Microsoft tool called Dev Home (Preview) which you can access via the Microsoft Store.
This developer-centric method tends to be more straightforward and encounters fewer challenges than its traditional counterpart, although it does have its limitations as will be discussed in the Dev Home segment later.
While Hyper-V is a feature of recent Windows editions, it isn’t activated by default. It must be enabled manually through the control panel by navigating to (Control Panel > Programs and Features > Turn Windows features on or off).
Click the top-level Hyper-V item. When you do so, you’re activating both the Hyper-V platform itself and the Hyper-V Management Tools, which allow running VMs through the Hyper-V Manager or via remote access tools such as the Remote Desktop Connection, known as mstsc.exe, or the Remote Desktop app.
I also typically activate the Windows Hypervisor Platform as this is crucial for some functionalities, as depicted earlier. Once these options are selected, click OK and Windows will proceed with the installation and activation on your behalf.
Image description: Activation process for top-level Hyper-V and the Windows Hypervisor Platform elements.
Windows Features will locate, install, and activate the necessary components to utilize Hyper-V Manager, and consequently, enable the operation of Hyper-V VMs. Once Windows Features completes its task, you will see a notification stating, “Windows completed the requested changes.” It also alerts you that a system restart is required to finalize the installation.
You must reboot your computer to use the Hyper-V platform. The simplest way to do this is by clicking on the “Restart now” button located at the lower right in the referenced image.
Click “Restart now” to prepare your PC for Hyper-V VM management!
Ed Tittel / IDG
After restarting your system, entering “hyper” in the search box of the Start menu will prominently display Hyper-V Manager as the top selection. Once restarted, the Hyper-V Manager is prepared for operation.
Launching Hyper-V Manager directly from the desktop it resides on—often referred to as a local launch—is usually the simplest method for configuring a Hyper-V VM. The first time Hyper-V Manager is initiated, it appears empty because it does not yet recognize any VMs. Initially, the center panels of Hyper-V Manager will indicate “No VMs” or “No item.”
Figure 4: When run for the first time, Hyper-V Manager shows precisely nothing.
If you click Quick Create, the top item in the right-hand menu you can soon remedy this situation. By default, Microsoft provides pointers to various predefined runtime environments, including evaluation versions of Windows 10 and 11 aimed at developers and (until early July) three different Long Term Servicing (LTS) branches for Ubuntu Linux (which may be freely offered to anyone who’s interested).
The right-hand side of Figure 5 shows the details for the “Windows 11 dev environment” item, an evaluation copy worth installing as a short-lived example. Select the OS you want to install and click Create Virtual Machine.
Figure 5: Select Windows 11 dev environment (left), then click Create Virtual Machine (lower right).
This downloads a ~21GB Windows image file. (On my Lenovo P16 Mobile Workstation, a 12th-Gen x86 platform, that took about 5 minutes to complete, including image verification.) Then, Hyper-V Manager creates a VM, extracts the virtual boot/system disk, verifies the image again, and wraps up the installation process (this takes another 5 minutes or so), as highlighted in Figure 6. Click Connect to establish a connection with the new test VM inside Hyper-V Manager.
Figure 6: VM successfully created. Next step: click Connect.
What happens next is that Hyper-V Manager opens a virtual machine window. You must start the VM to turn it on, as shown below. If you were using an ISO, this is when the process of installing Windows inside the VM would occur.
Before you can interact with a VM, you must start it up: click Start!
But because Microsoft has so kindly provided us with a predefined, ready-to-run VM for this development environment, clicking Start launches a boot-up screen (“Getting ready”) that grinds away for a minute or so. After that you’ll be able to log in to a Windows 11 desktop (account name User, no password). There’s your first Hyper-V VM!
Though this takes at least 15 minutes to work through, it’s about as fast and easy as creating a VM ever gets. The VM running inside a Hyper-V Virtual Machine Connection window is displayed, as confirmed by the title bar legend.
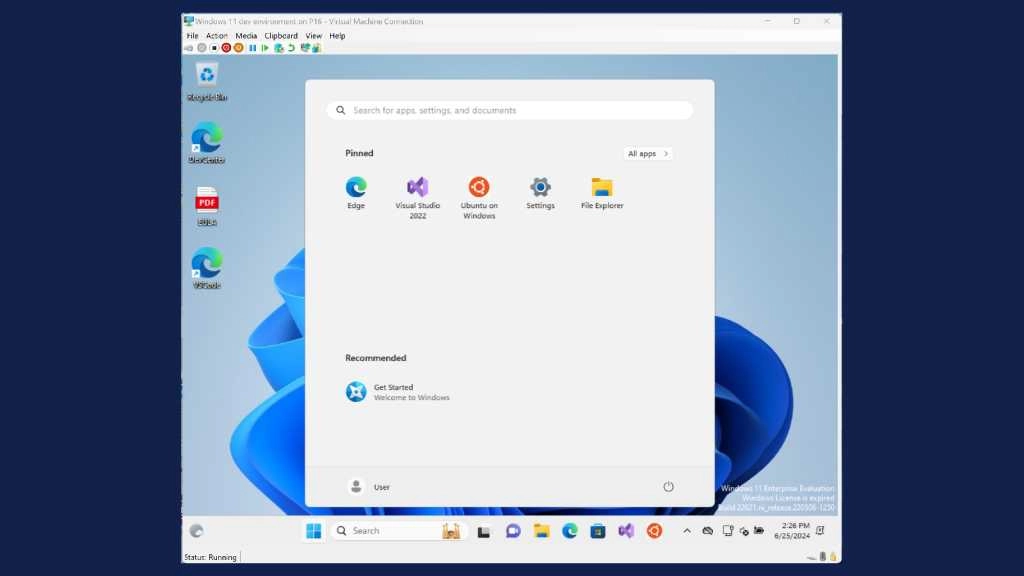
The start menu of the Windows 11 Dev Environment VM highlights a developer-centric focus.
Creating a Virtual Machine (VM) from an established virtual hard disk (labeled as .vhdx file with its configuration data) is quite straightforward. Essentially, it entails activating and launching a pre-configured VM that’s virtually ready for use.
There is an alternative method for VM creation illustrated in Figure 5. By selecting the “Local installation source” option at the bottom left of the “Create Virtual Machine” interface, you’re directed to browse through local storage and select an ISO — a file format typically used for Windows installations. (Refer to “The best places to find Windows ISOs” for trustworthy sources.)
This method permits the selection of any desired Windows version. However, it involves installing the OS on a new VM, which naturally extends the setup duration and requires more precision in configuration.
By opting for the Local Installation Source as shown in Figure 5, and accessing the E: drive where the May 30 Windows 11 Insider Preview ISO is stored, I designated this file as a choice for a Hyper-V VM configuration. The outcome of this choice is observable in Figure 9, where one must click on Create Virtual Machine (at the bottom right) to progress with the local ISO setup.
By targeting an ISO through File Explorer, you open VM creation options to whatever the file system can see.
This time when you click Create Virtual Machine, the Hyper-V wizard works from the ISO. Because I accepted all defaults, this VM shows up as “New Virtual Machine” in Hyper-V Manager. I right-clicked that string in the top center pane (“Virtual Machines” and selected Rename from the pop-up menu to call it “Win11.26100.” It appears as such in the narrative.
Renamed to Win11.26100 (for its primary Windows 11 build number), the new VM must now be installed.
Because we are setting up from an ISO file, installation of this OS image is necessary for it to operate as a VM. It’s critical to be prompt at this stage: after clicking Connect and then Start, immediately press any key to initiate the installer. Delaying may lead to a PXE boot message, halting further installation progress. Quick reflexes are essential here!
Once successfully initiated, the Windows 11 setup interface will prompt you to “Select language settings.” Following this, you will proceed through the standard Windows installation process. This process won’t be detailed further here, but remember you need a valid product key for the version of Windows you’re installing.
A common issue arises during installation: an error stating “This PC doesn’t currently meet Windows 11 system requirements” may appear. This occurs because the Hyper-V Manager Quick Create feature doesn’t automatically enable the Trusted Platform Module (TPM), which is critical for meeting these requirements.
Turn off the VM by selecting Action from the top menu, then Turn off. In the main Hyper-V Manager screen, select the VM you are setting up, such as Win11.26100, and click on the Settings at the lower right. This brings up the Settings page for the Win11.26100 VM. Navigate to Security. In the Security settings, you’ll notice that Secure Boot is enabled, but TPM is not. Enable the TPM by selecting the Enable Trusted Platform Module option. Then, click Apply and OK.
TPM must be activated prior to installing Windows 11, which isn’t set by default in Hyper-V Manager and must be enabled manually.
Following this setup, clicking Connect and starting the installer should allow it to complete successfully.
Once the process is finished, which took about 40 minutes on my powerful P16 Mobile Workstation, you’ll see a typical Windows VM window appear. Congratulations, you’ve added another VM to your Hyper-V lineup.
Aside from the Quick Create feature, the Hyper-V Manager also provides a New > Virtual Machine option, like the one shown in a previous figure. This option gives you more control and direct access to the detailed settings and choices for setting up a new Hyper-V VM.
This action enables more detailed management when setting up a new VM.
Using this option opens a New Virtual Machine Wizard that guides you through setting up a VM, as illustrated previously. This tool allows you to enter a VM name, select a file storage location, choose VM generation, configure memory and networking options, set up a virtual hard disk, and manage installation specifics. However, you will need to manually adjust the TPM settings as outlined earlier.
The New Virtual Machine Wizard methodically takes users through the VM creation process and its various configurations in a step-by-step manner.
In subsequent images, I will demonstrate setting up a new Windows 11 VM for version 24H2 (Build 26100.863), which was obtained from the Insider Preview downloads page. There is a screen that allows you to specify the VM name and location. I have named this VM Win11.24H2 and it is saved in the default location for virtual hard disk files.
Figure 14: The VM name is specified as Win11.24H2, followed by clicking Next to proceed.
Typically, all Hyper-V VMs are initially set as Generation 1. However, because Generation 1 does not meet the requirements for Windows 11 VMs, you must opt for the Generation 2 choice. This is necessary for the installation of a Windows 11 VM, as indicated in Figure 15.
Figure 15: Select the Generation 2 option to fulfill the requirements for a Windows 11 VM.
The subsequent phase involves allocating 8GB (8,192MB) of RAM, which is double the default amount, for the Win11.24H2 virtual machine.
This time, please ensure it’s doubled from the usual 4GB to 8GB.
The following action involves choosing the Default Switch as the Connection option under the Configure Networking section. It is critical to remember that the default setting is “Not connected,” indicating that the VM will not have access to any networks. Selecting Default Switch permits the VM to utilize the networks accessible to the host PC. If your host setup includes additional switches, they will show up in the dropdown menu for this VM configuration, and you can select them as needed.
For the VM to have network (and internet) access, use the Default Switch.
The subsequent step involves linking a virtual hard disk that the VM will utilize. We continue to use previously mentioned default settings. Alternative options are “Use an existing virtual hard disk,” which connects to the content as described in the earlier development environment, and “Attach a virtual hard disk later,” allowing for the completion of the VM setup without immediate allocation or linkage to a virtual hard disk. Refer to the setup details for Win11.24H2.vhdx.
Figure 18: This represents the default allocation (127GB) for Hyper-V VM virtual hard disks.
Next comes the fun part: providing a file system link to an ISO and electing how (or if) to install that image. This reads “Installation Options” on the left-hand side. In this case, we’ll link to the ISO I downloaded from the Insider Preview downloads page, and tell it to install the OS from that file, as shown in Figure 19.
Figure 19: The selected radio button instructs the installer to find a specific Windows 11 ISO file.
At this point, the wizard is finished, so click Summary on the left to show your work so far. It will show all the settings you’ve made. Click Finish to complete the VM creation process. Then, you’ll return to Hyper-V Manager, where you now see a VM named Win11.24H2 in the upper center “Virtual Machines” pane.
The new VM, Win11.24H2, is turned off. That’s good!
You might consider initiating the installation process for Windows 11.24H2, but an essential step remains—activating TPM in the new VM’s Security settings as previously discussed. Once activated, you can proceed with the installation of the Windows 11 OS image as mentioned earlier.
The basics of Hyper-V Manager and setting up VMs have been covered. Now, let’s delve into the more intricate details.
All VM interactions are inherently remote, which means there is no direct connection via physical mouse, keyboard, or monitor. Instead, virtual components are mapped onto actual hardware. This setup includes CPUs, RAM, storage, networking, and so on. Importantly, one of the advantages of VMs is their capacity to support network-wide connections to a central hypervisor.
However, complexities arise when a remote connection employs Windows Remote Desktop Protocol (RDP) through either Remote Desktop Connection or the Remote Desktop app, particularly when running on Hyper-V. Challenges faced include initiating the Windows Installer for an ISO-based set-up, and the necessity of enabling TPM to facilitate the installation.
For starters, you can’t start a new Windows 11 VM from inside an RDP session, as it requires reading and mounting the targeted Windows 11 ISO to run its Setup.exe. Oddly, this is only possible from a local login on the host PC, not via an RDP session. If you attempt to run the Start button during an RDP session, the VM will fail to boot up and launch Setup.exe.
If you click Start, you will be met with a black screen in the VM window, instead of the Windows 11 installer initiating. To resolve this, shut down the VM by clicking Action in the top menu and selecting Turn off. Afterwards, activate the Start button from the physical host PC using the local mouse or keyboard. Once Setup.exe starts, you can use an RDP session to view the VM, displaying the initial Windows 11 installer screen.
Once Setup.exe is operational, you have the option to RDP into the VM, if desired.
The next challenge arises when you select the Install now option. At this point, you’ll realize that you cannot copy and paste a Windows activation key into the Activate Windows prompt. This is because such functionality is only available through an enhanced session in RDP, which isn’t an option until after Windows 11 is installed. Addressing this issue involves adjusting the Windows Hello login settings, as these are enabled by default and incompatible with enhanced sessions that allow clipboard sharing between the remote and local sessions.
When attempting to input the key in Activate Windows, you’ll find that it only accepts manual entry.
You must manually type the 25-character alphanumeric Windows key. Alternatively, you could opt for the 30-day evaluation period of the Windows 11 developer environment, which doesn’t require a key but offers limited access time.
But there’s one more RDP complication to overcome: initially, you cannot log in to your new desktop until you deselect the “Enhanced session” option under the View menu of the RDP client. After adjusting this setting and signing in, go to Settings > Accounts > Sign-in options, and disable the setting in “Additional settings” that states For improved security…, as referenced in a prior figure. You can then re-enable the “Enhanced session” to use features like clipboard sharing in RDP.
Note that the “Enhanced session” should be turned off in the View menu. Deactivate the feature under “Additional settings” before you turn it back on to ensure functionality such as cut and paste in RDP.
Following the steps previously described, you now have operational Windows 11 VMs, mostly configured with the default settings provided by Hyper-V Manager. By establishing the basic, default Win11.26100 VM through Quick Create and the slightly adjusted Win11.24H2 VM that follows in the New Virtual Machine Wizard, you gain valuable insights into the mechanics of VMs and default provisioning strategies.
The default settings of virtual machines (VMs) created by Hyper-V Manager are inherently tied to the specifications of the host computer. If the host boasts a robust configuration like my Lenovo P16 Mobile Workstation, which features 24 cores, 64GB of RAM, and approximately 4 TB of total storage capacity, VMs created on it similarly possess higher specifications. Conversely, a less powerful host will generate VMs with reduced capabilities.
Generally, the default configurations assigned by Hyper-V Manager are adequate for standard operations. Users familiar with this environment have the option to customize these settings, although reducing them below the recommended defaults might not always be beneficial unless necessitated by specific circumstances or hardware constraints.
For more info on Hyper-V and VMs: Explore Microsoft Learning’s free 45-minute educational module titled Configure and Manage Hyper-V virtual machines for a detailed walk-through. Additionally, the Windows 11 Forum provides a comprehensive series of tutorials under their Virtualization section, which includes 54 tutorials covering various VM-related topics.
The introduction of version 0.13 of Microsoft’s Dev Home (Preview) on April 23, 2024, marked a significant enhancement with the inclusion of “Environments.” Microsoft describes these as functionalities designed to aid in the creation, management, and configuration of Hyper-V VMs and Microsoft Dev Boxes, details of which can be found in their release notes on GitHub.
Many individuals may overlook Dev Boxes, an Azure service aimed at boosting developer productivity by providing preconfigured, project-specific development environments in the cloud. This service requires an Azure subscription. For those interested in utilizing Hyper-V VMs, they should pay attention to its VM capabilities, which necessitate Windows 11 22H2 or newer.
Having encountered various obstacles previously that can hinder the creation and use of VMs via Hyper-V Manager, I explored whether Dev Home (Preview) could offer an improved experience. I intentionally ran Dev Home on a remote PC through an RDP session. Within Dev Home, I accessed the Environments option, which was indicated by a small blue highlight bar to its left.
Dev Home Environments displayed existing VMs as well as the option for “New Virtual Machine.”
Dev Home successfully identified all the VMs listed on the P16, indicating their states such as Stopped, Running, or Saved, which it seems to classify under “Environments.” Interestingly, utilizing the Create Environment button at the top right-hand corner streamlined the process of setting up a new Hyper-V VM:
This action selects the “Windows 11 dev environment” provided by Microsoft as the base image for the new VM.
After initiating the VM creation with the Create Environment button, an extended wait time is necessary. Dev Home undertakes the downloading of the sizable Windows 11 dev environment, approximately over 20GB, followed by the extraction of its files. On the P16 Mobile Workstation, this entire process lasted about 15 minutes. The downloading progress is displayed by Dev Home, noting the download completion at 76% at one point.
Figure 26: Progress in downloading the ISO for the Windows 11 dev environment stands at 76%.
When the extraction process ends, the ISO is mounted and the VM ready to launch. You’ll see Environment information for your new VM (NewVM2, in this case) like that shown in Figure 27. You must click the Launch button (far right) to start the VM installation process.
Figure 27: Click the Launch button to fire off the Windows installer for the VM’s OS.
When you do that, a small VM window opens to present you with a Start button to fire things off. Click that Start button!
Click the Start button to put Setup.exe to work to install the VM’s OS.
This initiates the Virtual Machine, triggering the execution of the Setup.exe from the mounted ISO. Subsequently, a larger VM window, labelled Hyper-V, with a spinning progress circle appears. You will then be prompted to adjust the VM window size for optimal viewing (a minimum of 1680 x 1050 is recommended). A login screen for a default “User” account (which does not require a password) will display. This entire setup process takes less than two minutes. Clicking Sign in will bring you to the desktop environment.
Once signed in, the display will shift to the desktop of NewVM2, which features a minimalistic Windows 11 installation. Included in this setup are Visual Studio 2022 and Ubuntu on Windows, running on the Enterprise Evaluation build 22621.3447. It is also noted that using a legitimate Windows 11 Enterprise key to activate this installation is futile, as it will reject the keys.
But here we are, having installed a working Hyper-V VM for Windows 11 from start to finish inside an RDP session! Thus, the Dev Home approach completely sidesteps all gotchas one encounters when using Hyper-V manager, to wit:
There’s just one problem: Dev Home environments don’t let you grab an arbitrary local ISO on a drive. You can only use Environments that Microsoft makes available (these are essentially the same as the “gallery images” shown in Figure 9 earlier in this story).
For any other Windows images you might want to run as VMs, you must use Hyper-V Manager and its quick or slow create processes — that is, unless Microsoft responds to my feature request to add access to local ISOs to Dev Home’s existing image options when creating a VM.
What I learned from digging into Dev Home and its capabilities — especially when using RDP — is that it’s entirely possible for Microsoft to update and rationalize its Hyper-V VM creation process. Whether or not they choose to do so is up to them. I certainly hope they’ll figure this out, and do just that.
Ideally, Microsoft would fix Hyper-V Manager to make it Windows 11-aware (and friendly). And then they might add local ISO access to image selection options in Dev Home. Frankly, I’d be happy with either of these approaches (you can always tweak a VM created in Dev Home in Hyper-V Manager through its many Settings categories and options). Although it would be great to see both happen, I’m not holding my breath…
Welcome to DediRock, your trusted partner in high-performance hosting solutions. At DediRock, we specialize in providing dedicated servers, VPS hosting, and cloud services tailored to meet the unique needs of businesses and individuals alike. Our mission is to deliver reliable, scalable, and secure hosting solutions that empower our clients to achieve their digital goals. With a commitment to exceptional customer support, cutting-edge technology, and robust infrastructure, DediRock stands out as a leader in the hosting industry. Join us and experience the difference that dedicated service and unwavering reliability can make for your online presence. Launch our website.